

How To Make Cut List From Sketchup Drawing
How to get a cutlist from your SketchUp model
A cutlist isn't that hard to create by hand, just if you lot're modeling your projects in SketchUp, there's a far easier way
You've probably already discovered that SketchUp is a great tool for designing your project. You can sketch out your ideas to get a good feel for how they volition look making it easy for you and your client to go on the same folio with a design. In one case you take the model drawn, though, what next? Well, later on you've drawn the model, and accept the visible details worked out, you can add together the joinery and other $.25 to the model to create a programme to take to the shop. Typically I find that I don't need a formal plan for myself, although it's certainly possible to make i. I employ SketchUp and LayOut to make the digital and printed plans for many of the projects featured in Fine Woodworking Magazine. For my ain use, a few images exported from the SketchUp file usually suffice. It is handy, though, to have a cutlist so I accept the overall sizes of the parts at hand likewise as a shopping listing when I become to the store for parts.
At present, a cutlist isn't that difficult to create by hand. I know a woodworker and SketchUp user who would draw his project and then sit down downwards with the Record Mensurate tool, paper, and pencil and make upward his cutlist. There's a better way, of course. When I showed him he was amazed.
There are a number of extensions for SketchUp that will create cutlists. I've tried a few of them and found they all do what they exercise quite well. Many of them seem like they are aimed more at the kitchen and bath cabinet makers. The one I prefer is simply called CutList. Every bit with all of them, CutList generates the list based on the dimensions of the bounding boxes of the components and groups in your model. It does ignore ungrouped geometry and so you need to consider that. I advocate using components for a long listing of reasons. In regards to creating a cutlist, at that place are ii primary benefits of components. Start, y'all are prompted to name them equally you create them. That makes it easier to know which part's dimensions you lot're looking at. If all the parts are named 'Group', it's hard to know which is which. (Yous can go back and rename groups after creation if you wish but it takes actress steps.) Another benefit to components as related to the cutlist is that you tin change the axes to align them to angled parts. You lot'll run into how that comes into play in the video.
Of course, yous'll desire to have detailed your model and drawn it accurately. Since the cutlist shows the overall dimensions of the parts in your project, you'll need to include details such as tenons and dovetails. Negative spaces such equally mortises and the spaces between the dovetail pins don't come into play with the cutlist so yous can include them or not as you lot desire. Remember, this is a computer plan and GIGO(garbage in, garbage out) applies. The more than precisely y'all create your model, the more authentic your cutlist will exist.
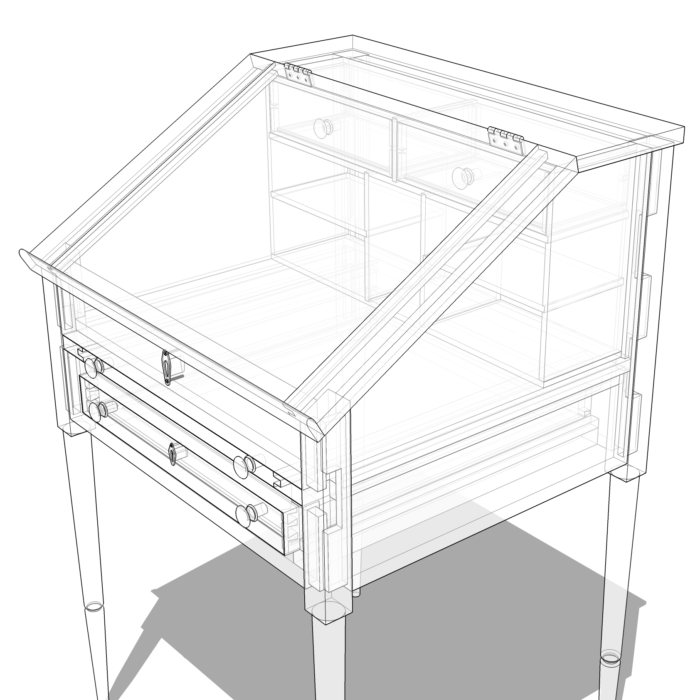
I used this model of a colonial stand upwards desk as an example in the video. As you can come across in the X-ray view, all the wooden parts are fully detailed with tenons, dovetails, and and then on.
CutList was written by Steve Racz and is freely available in the Extension Warehouse. Access the Extension Warehouse directly from SketchUp and install information technology automatically. Afterward yous've installed it you'll want to do a little bit of setup to customize information technology for your use. The offset window of the user interface looks like this. There are sections for selecting the things you want to prove in the output and determining how they look. The text boxes after 'Part Words' and 'Sheet Fabric Words' are for words you've used in your component definition names that aid the extension sort the components into the correct sections of the list. You can add together words to these windows as I've done in the post-obit image. If your components don't include words from either of these lists, they are assumed to exist solid wood. Later you make whatever changes to the settings, you tin save them so y'all don't accept to make those changes again. The question marks in the bluish circles are help buttons. Click on the button and a window opens to give you some information nearly the settings in that line.

Under the Layout tab you'll find more settings which are useful for determining how the extension deals with the solid wood and sheet cloth components in the model for the layout output. These settings have no touch on on the cutlist, though.

When you click Run, the extension will process through the model and generate the parts layouts as well as the cutlist. The processing should be nearly instantaneous. When I create a model for a plan, I actually have several copies of the parts in the model space so I select just the assembled model before running the cutlist so I don't get multiples of the parts in the list.
The get-go office of the layout looks like this:

And the first part of the cutlist looks like this:

I besides find the cutlist to be useful for identifying potential errors in the model. I find it all-time to set model precision as high as information technology will get for the units I'chiliad using. When I'm working in Fractional units, I set Precision to 1/64 in. I wouldn't ever intentionally draw parts to 64ths so I wouldn't wait to meet 64ths in my cutlist. If I practice, that raises a red flag for me. Every bit yous can run across in the screen shot of the cutlist, the forepart legs show as ~28-39/64″ long. Both the tilde and the 64 take hold of my attention. In this case, the acme of the leg is cut to friction match the angle of the elevation then this dimension has a reasonable caption. Using the 64th-in. precision helps to avert round errors, too.
So take a expect at the video. Hopefully you'll become a better feel for how this useful extension can work for you.
–Dave
More on FineWoodworking.com:
- Using components in SketchUp
- Adding Context to Your Models With Lucifer Photograph
- Drawing a Kumiko Panel

Source: https://www.finewoodworking.com/2017/10/18/get-cutlist-sketchup-model
Posted by: wrightcoma1941.blogspot.com
0 Response to "How To Make Cut List From Sketchup Drawing"
Post a Comment